
Elevate Your Game: Master the Swing With These 15 Proven Driving Range Tips!
- DT Writers Team

- Jul 26, 2021
- 16 min read
Updated: Oct 31, 2023
What is the single most effective thing that helps you advance in your golf game?
Practice, lots of practice!
And where is the best place for your practice?
The driving range.
In this guide, we outline 12 driving range tips you can use to identify specific areas that will help you improve your overall game and ultimately lower your score.
Let’s get right into it.
As Top US Golfer, Sam Snead said, ‘Playing golf is like eating...it is something that has to come naturally.’
Driving practice improves your ability to master these skill sets by boosting your muscle memory and helping you play more naturally.
Each of these tips help you boost your mental and physical capabilities to allow you to play at your best on the course.
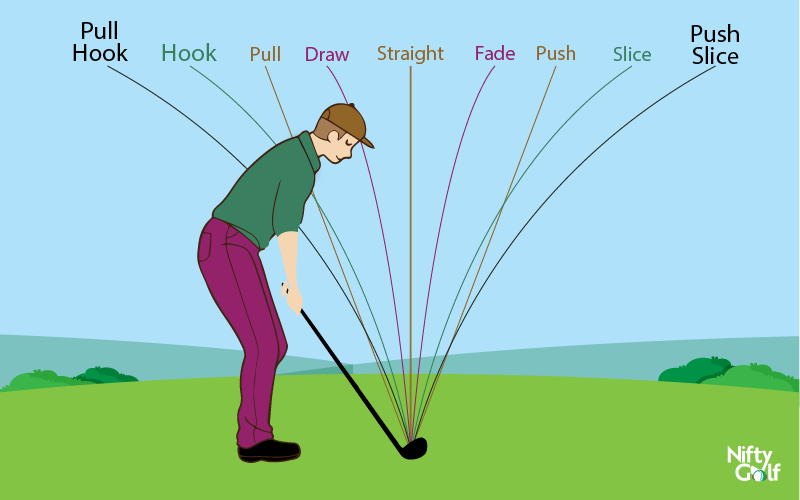
The Best Exercises to Fix Your Slice
Let’s be honest.
Slices suck!
They cause you to lose your accuracy, distance, and temper, which affects your overall performance on the course.

So,
What causes a slice?
An outside-in swing path is one of the most common causes of a slice and occurs during your initial downswing when your club is outside your ball line https://www.thoughtco.com/what-is-a-slice-in-golf-1560987.
To make ball contact, you compensate by swinging your club too inside this line and outside the line of your ball.
Combined with your open clubface that also affects your outside-in swing path, you end up with a bad shot that sometimes goes OB.
How to Fix Your Slice
Exercises and drills that help you fix your slice and improve your driver include:
1. Embrace a closed stance to counter outside-in swings
Outside-in swings can result in very many different bad shots.
If you play with a closed face, you hit a straight pull, an open face results in an all-out slice, and a square face causes a weak fade.
This driver-only drill allows you to have the ideal swing square to your intended target, increase ball flight, keep your ball in play of the tee, boost consistency and improve your overall driver performance.
How to execute this drill
Take your normal stance with your driver
With your back foot, step back 2-3 inches and be careful not to widen your stance
Swing your club approx. 10 times
If you continue coming outside-in, move your foot back a little more and close your clubface a bit to help get it square at impact
After you develop your best swing path, use your driver to monitor your dispersion
If you star left, this means you have overcorrected and can now swing down the right path
Gradually move your back foot to where you originally started
What to focus on
Take time to monitor your swing path. Improving your swing path results in improved accuracy at impact and increased ball flight and rolls when it hits the ground.
Focus your attention on internal cues (how your body moves), and external cues (what your club does) to identify your most comfortable stance and boost consistency.
Consistency with your driver boosts your confidence throughout the course, which helps you hit lower scores.
2. Don’t Aim Right or Left, Aim Straight!
Hitting your ball off the tee and seeing it flying down the middle of the fairway is one demotivating feeling.
Eventually, your hits start to fade right and result in a slice that causes your ball to sail into thick groups of trees on the course.
The most common response for players that slice their drives is aiming left.
Doing so makes sense, but only if you’re sure that your ball will significantly move from left to right during flight.
If not, aiming left only makes the problem worse since you are forced to repeat the same mistake to keep your ball in play.
This makes you develop a bad habit, something we don’t recommend you to do.
How to execute this drill
Tee you ball ‘high’ for upswings and distance, or ‘halfway’ for more shot control and accuracy
Put your ball high in your stance and align your left toe with the ball.
Take a wide stance for a larger range of motion and balance your weight on both feet
Ensure your head is behind the ball and grip the club high
Draw your club up and back, shift your weight on your right foot while keeping your eye on the ball and swing.
Make repetitive hits ensuring that the clubface strikes the ball directly at the center.
What to focus on
The main things to focus on during this drill include your tee height, golf stance, grip, and swing.
Each aspect affects your drives in different ways and can be adjusted depending on your intended results.

Variations
Your tee height, golf stance, grip, and swing greatly determines the speed, distance, accuracy, and control of your driving shots.
With this tip, you adjust these aspects to get the intended results in your driving shots.
If you want more distance and speed, ensure that
You tee your ball high
Your ball is high in your stance
You take a wide stance
You grip your club high
You strike your ball from beneath, directly in the center
If ball control and shot accuracy is what you seek, ensure that
You tee your ball halfway
Your ball is low in your stance
You take a narrow stance
You grip your club lower
You strike the ball with the clubface flat
3. Only Hit Once You're Aimed!
I know this sounds like it should be common sense, but trust me, most golfers never hit their balls when they are aimed.
In fact,
Instead of fixing the problem, many golfers compensate bad shots by aiming either further or closer in a particular direction (right or left).
This is the wrong thing to do!
The accuracy of your aim, intended ball path, and end result goes a long way when you play from the short grass.
How to execute this drill
Stand behind your ball while looking down straight on your target line (no more than 10 feet)
Create a body line by placing your feet in place and ensure its parallel to your target line
Address your ball with the sole of your club placed perpendicular to your target line
Repeat this drill as frequently as possible

What to focus on
Perfecting your aim on the range helps you to ‘free up’ your swing and improves the direction of your shots.
For the best results during this drill, pay particular attention to your posture, your ball path, and the target.
Combined, these three features help you to visualize and aim your shots better during the course of your round
4. Transfer Your Weight
One common mistake many golfers make during golf backswing is to transfer weight onto their back foot and leaving it there throughout your downswing and follow-through.
Doing so causes you to open your clubface, release your club poorly and swing outside the ball line.
Recipe for a big slice!
You move your weight more towards your back foot during your backswing, shift it towards your front foot as you downswing, and hit your ball.

How to execute this drill
Place an object (a golf bag or anything that stands straight) next to your front foot, up to your left thigh
Swing back as you allow your thigh to move away from the object as you transfer your weight towards your back foot
As you downswing, transfer your weight properly to your front foot
Your thigh should come into contact with the object as you swing through
Repeat the drill frequently to minimize chances of a big slice
What to focus on
When performing this drill, identify a comfortable posture that enables you to transfer weight naturally between your front and back legs for the perfect golf swing.
Although it seems like a remedy for slices, this drill also helps you to;
Maintain balance on your swings
Take accurate shots easily
Maintain a smooth follow-through on your golf swing
NB You can use this drills to perfect other shots on the fairway and roughs
5. Diversify Your Targets
This particular tip is less of a drill but rather a way to help you enjoy your practice routine.
Finding ways to keep your practice enjoyable prevents your routine from becoming a chore.
Be it your short game, driving range, chipping or putting green practice, finding ways that allow you to have fun during practice; you end up doing it more often.
This drill does exactly that because it requires you to simulate situations arising during the course of the round.
How to execute this drill
Starting with your driver, set a reasonable target (I prefer to pick a flag as the aim spot)
Take your swing
If your drive is 10 yards more or short of the target, deduct one point
If your drive is within your acceptable 10-yard convergence, add 1 point
Using every club in your bag, take 5 shots and record how fast you get to 21
Shrink your target to a 5-yard area when you near your wedges
If you consistently get to 21 before hitting with all your clubs, shrink the target area to make it more challenging
What to focus on
When performing this drill, focus on your hits and how fast you can get to 21 before getting through your bag.
When you become a master of 21, you sharpen your game and improve your skills exponentially.
This drill helps you to;
Bring fun to the range
Embrace course management
Minimize ‘range rut’ when you hit with the same club over and over
Improve your vision on distance and terrain change on the course
6. Release The Lag!
During your backswing, there is a point (usually when your club is around your waist height), where you need to cock your wrists until before impact.
This is what we call ‘lag’
When ‘lagged’ your wrists keep your hands behind the ball but when ‘unlagged’ your club heads out in front of the shaft during impact.
When you hold the lag correctly and release it at the right time, you accomplish two things.
You allow your clubhead to square up and control the ball’s direction
Club head speed increases, which results in increased ball speed and distance
This drill enables you to achieve just that!

How to execute this drill
Using your mid-iron, and with your feet almost together, swing the club
Take your club back just past your hip height until the back of your left-hand faces away from you and cock your wrists
Swing at the ball as you release the lag through impact and follow through
Hold your position
The back of your right hand should be facing away from you
Repeat this drill using all your irons
What to focus on
The main focus when performing this drill is learning how to;
Cock your wrists at the right time
Release the lag at the right time
The drill enables you to take advantage of physics for increased clubhead speed, improves your balance throughout the swing and helps you to keep your swing on plane.
7. Develop a Solid Takeaway
If you want to develop a good golf swing, the takeaway of your golf club should be your starting point.
Mostly, your club returns on the same path it's taken away.
So,
If you swing your club inside your intended takeaway path, it encourages a low swooping swing that returns outside in plane.
Pulling inside shifts your entire axis, makes you cast outside, changes your swing plane and swoops outside in via the impact zone.

These two drills help you to develop a repeatable takeaway that starts you on the right plane.
Bench drill
You do not actually hit your balls in this drill.
The idea is to help you experience what an ideal takeaway feels and looks like.
You can use a regular park bench or the benches on your driving range to perform this drill.
NB Use your mid-irons (5 and 6-irons) for this drill.
Reason? Mid-irons allow you to see the orientation of the club toe more easily compared to any other club in your bag.
How to execute this drill
Stand with both your shins touching the bench and get into address stance
Take your club back slowly as you begin your backswing
Allow the club shaft to ride along the bench’s edge
When the head is no longer in contact with the bench, stop your swing
Take note of the club head orientation and shaft angle
The club head orientation should show the club toe pointing skywards and the shift angle pointing away from your target line
Mop drill
Wally Armstrong, a renowned PGA teacher first suggested the ‘Mop drill’
Initially, golfers put a weight on the end of their club for this exercise but the mop helps you feel the ‘low and slow’ much better.
How to execute this drill
Take a simple floor mop
Swing it as you would swing your golf club
The concept here is to encourage a low, slow takeaway because of the increased weight of the mop’s head
What to focus on
As the fuel that drives your engine (golf swing), focus on making your takeaway comfortable and consistent when performing the two drills above.
Combined, the two drills help you to
Control your swing
Refrain from an outside-in swing path
Start your swing on the right plane
Shift your weight properly to your back foot
8. Take Note of Your Divots
As seen earlier, your club travels in an outside-in swing path through your downswing once you hit a slice.
After hitting a shot from the fairway, one effective way to check your swing path is by checking your divot (the hole left behind when you hit your ball)
You make divots with all your clubs (except your driver and putter) since the two clubheads move up whereas the rest move down at impact.
You take deep or shallow divots depending on your swing shape, intended shot and the club you use.
This drill isn’t really meant to fix your slice but rather an easy way to find out why you hit one.
NB: Taking clean divots like most professionals don’t necessarily help you improve your shots but good shots from your irons produce good divots.

Divots offer essential information including the causes of your slice and the severity of your outside-in swing path.
How to execute this drill
With a handy kitchen broom, take several swings (approx. 10)
Reach and extend your left arm on the follow through
Ensure the broom bristles slightly brush against the floor
After 60+ swings, get your clubs (irons, wedges, and woods) and practice using them
You should identify the most comfortable swing that allows you to take beneficial divots
What to focus on
Your focus when taking this drill entails identifying your outside-in swing path, swing habits and increasing consistency in your divot shots.
Eventually, your divot starts to point closer to your target – a sign of your improving swing habits.
9. ‘Duck Feet’ Help You Gain Distance
As Ken Venturi puts it, ‘A golfer is as good as he walks. If he has duck feet, chance are he is a good ball striker.’
The common belief is that your feet must be square at address, especially when hitting with your driver, hybrids, woods or long irons.
Because of physical limitations, the desired hip turn becomes difficult to do.
Flaring your feet, however, ease the stress on your hip and knee joints, enabling you to take long shots comfortably.
Australian pro golfer, Greg Norman, also believed that ‘duck feet’ add up to 10% extra yardage on his driver.
How to execute this drill
Start this drill using your driver
Take long swings
During address, flare both your feet approx. 15% outwards and notice how rotating your back hip becomes easier
Continue through your swing while allowing your body to follow the leader
What to focus on
In this drill, focus on rotating your back hip comfortably especially if you have a tendency of sliding your hips rather than rotating them.
Focus on preventing your front knee from straining under the strain of your turn by assuming ‘duck feet.’ The drill helps you straighten your front knee to be able to accept weight transfer.
This drill also helps you control the dreaded (‘reverse pivot’), which results from an incomplete hip turn and causes your weight to move forward during the backswing and fall backward during your downswing.
This drill helps you to;
Make proper hip turns
Add distance when using long clubs
Control a reverse pilot
Reduce physical strain on your knees and hips
10. Swing Through the Ball, NOT "at the Ball!
Hitting your driver is a combination of physical skill, confidence, and mental concentration.
Once you master the skill of hitting accurately and consistently with it, most other clubs become somewhat easier to use.
Moreover,
A good tee shot is usually a lead-in to a good score because of distance, accuracy, and consistency on your shots.
For the best tee shot, ensure you swing your club through the ball and not directly at it and this drill teaches you just that!
How to execute this drill

Using your driver, start with mini-swings and progress to full swings
Hit your balls with your feet together
Take full-swings at 50% power while using this sequence, (2 shots going back on your backswings and 3 on your downswings)
Extend your clubhead down the target line and swing with a high follow-through position
Keep your grip light and body tension free during the swing and at address
Hit balls to the 100-yard marker flag as you gradually move to 125, 150 and 175 yards
What to focus on
In this drill, focus on establishing smooth transitional swings that help you make the most out of your drive shots.
For an effective driver shot, you need to extend your clubhead downwards, slightly lower your shot power and grip, and swing your club smoothly a high follow-through position.
Bottom line?
This drill helps you to;
Swing your driver better
Control your swing speed
Improve accuracy on long shots
Gain distance and speed while maintaining accuracy
11. Let the Sand Be Your Friend
Unless you are an advanced golfer (mid-handicap or better), any type of bunker shot perhaps frightens you.
In fact,
Maintaining confidence in the sand proves difficult for many golfers to accomplish.
Time to be honest with yourself.
How often do you practice sand shots?
Like many golfers, I would guess not much.
The best way to boost your confidence in the sand and improve your bunker shots is through practice and lots of it.
The drill below prevents you from encountering the embarrassing result of leaving your ball in the sand.
How to execute this drill
Before taking a single shot, familiarize yourself with the sand you want to play out of.
Bunkers differ in many ways including depth, topography, and the type and consistency of the sand.
Skim around the sand while taking swings with your club to understand what to expect when you start taking actual shots.
Lay any dollar bill in the sand next to your ball. Ensure your ball stays slightly behind the center of the bill.
Take a shot
Look at the results in the sand
The displaced sand should be the same size as your dollar bill.
If this is the case, your ball should land gracefully on the green
If your divot was deep, you went down too deep resulting in a short, inaccurate shot that doesn’t make it to the green.
What to focus on
When undertaking this drill, focus on expanding your comfort zone and boosting your confidence by improving your approach shots.
Gradually, this drill helps you to;
Boost your confidence in the sand
Improve your performance on consistent sand
Lower your score
Never leave your ball in the sand again.
Variations
You can have some variations on this drill.
If you get better fast, change the position of your ball, e.g. transfer your ball to an area with a (higher or lower) gradient within the bunker and take your shots from there.
For a more ‘situational practice’ approach, award yourself points as follows; 1 point for getting the ball out, 2 points for getting your ball on the green, and 3 points for getting with 5 feet.
Deduct 1 point if your ball fails to leave the bunker.
Take 10 shots and try to get 15 points out of them.
Gradually, hitting from the sand should be easier and more enjoyable.
12. Play With All Your Clubs When Chipping
Different terrain and other intermediate obstacles on the course present themselves around the greens.
Such factors dictate the club to use to optimize your performance.
When on the practice green ensure you work your way through all your clubs (starting with the wedges as you work your way to the longest club you use to chip with (probably your hybrid).

How to execute this drill
Starting from your wedges up, take easy, flat shots
Hit 5-6 shots using each club in different points of the pitching green
Gradually develop different approaches depending on the situation
What to focus on
Your main goal here is for you to get up and down every time and develop a rapport with your clubs for more proficiency, consistency, and accuracy when chipping.
Eventually, this drill helps you to;
Enjoy shots outside your comfort zone
Boost your confidence when your ball misses the green
Manage and control your approach shots
Lower your handicap
13. Leverage The 7-iron Drill for Consistency and Accuracy
You’re much more likely going to use your wedges and irons than any other club in your bag.
Your driver only comes out approx.10 times (for accurate par 4’s and par 5’s) so using your driver to get more distance isn’t an ideal starting point.
As golf magic’s Andy Roberts says, ‘Work on improving your iron play before you have some fun with your driver and woods.’
Start your trip to the driving range with your 7-iron – (statistically the most commonly used club after your wedge and putter) and move to the other clubs after your swing improves.
How to execute this drill
Identify two flags from the driving range
Try to put your ball directly between them like a soccer player kicking a field goal
Try to put your ball 10 times in a row between the two markers
If you do, pick a bigger club and repeat the exercise
Repeat the exercise until you reliably make your shots using all your clubs
What to focus on
When performing this drill, your focus should be your two targets and hitting your ball with different clubs between them.
Through this drill, you learn that the pin is not always the best target and helps you to;
improve your accuracy and consistency
remain calm when taking shots
learn to use your irons fast and easily
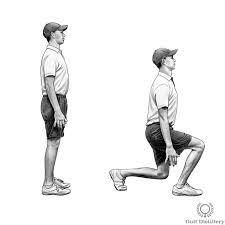
14. Warm Up and Stretch Before You Get Started
Many golfers immediately reach for the driver when they get to the range. But in a round of golf, you rarely use your driver.
Stretching improves your range of motion by over 17% and helps you relieve chronic joint pain, and avoid injury.
How to execute this drill
Starting with your sand or pitching wedge, hit different shots from the range
Hit the shots until you’re in a good rhythm
Hit with your irons, hybrids, fairway woods, and finish up with your driver
What to focus on
During this drill, focus on stretching well to increase your range of motion.
This helps you swing the clubs better and take better shots.
Also, focus on maintaining a consistent hit with different clubs without necessarily having a specific target.
Through warm-up and stretching, you;
hit better shots
save time
remain prepared for your next round
15. Remain Confident Throughout the Course
You should have an idea of what you intend to do before you get to the driving range or any other practice area within the course.
The best way to do so is to develop a routine and follow it closely and honestly as possible.
Many advanced golfers work their way from the wedge up through the irons, hybrids, woods, and finish with their driver.
Once you are done with the range, try out the putting and chipping greens and then head to the tee box.
Whether you choose to work on a specific problem, it’s crucial to remain confident and relaxed to boost your overall performance.
Confidence helps you identify and work on specific problems and implement changes to become a better player.
Although this is not a drill, maintaining confidence on the course;-
helps you relax and take better shots
allows you to have fun throughout the game
enables you to handle bad shots better
Why Should You Practice Your Driving?
Driving distance and accuracy - the two things that every golfer wants most on the course.
Although putting remains as the key to your success in golf, getting to the putting green requires you to leverage on distance (especially of the tee and fairway), and accuracy.
Your driver is the most difficult club to hit with for most golf beginners & amateurs, and mastering it increases your advantages throughout the round.
Practicing your driving helps you to gain more distance on the course, and control the aspects like the accuracy, speed, power, and distance of your shots easily when you need to.
Doing so also boosts your confidence when playing other shots (fairway wood and bunker shots) on course.
When you master using your driver, you gradually master other long clubs on your bag easily, which helps you lower your score and improve your overall performance on the course.
Bottom line?
You become a better golfer (in almost all aspects of the game) when you practice your driving regularly.
How Long Does It Take To See Results?
Improving your driving game is a life-long exercise.
Many places advertise that you can improve your driving game within a couple of weeks – and it's true in some cases but if you want real, long-lasting results you have to be consistent on your driving practice.
Even professional golfers like Tiger Woods and Rory Mcilroy practice their driving regularly and you’re going to want to include it in your routine for as long as you can.
How To Keep Driving practice Fun
Let's face it,
Driving shots may be difficult to hit at first, but they’re fun compared to other shots like putting drills.
After a long time through the routine, however, you might start getting bored and want to move to other shots.
The difficulty of taking drive shots can also make practice boring or make you lose focus.
But, if you really want to see progress during driving practice, you need to have fun while at it – and you can do so by including ‘fun games’ to your routine.
As we saw before, drills like the mop and kitchen broom drills make driving practice fun. You can also mix drills with other fun activities like diversifying your targets and including short competitions amongst your peers to allow you to have fun during drive practice.
Conclusion
Practice your driving regularly and you will start to see some real improvements in your entire game.
Becoming a great golfer requires hard work and dedication, but when you master your driving skills, you get closer to becoming one.
References


Comments